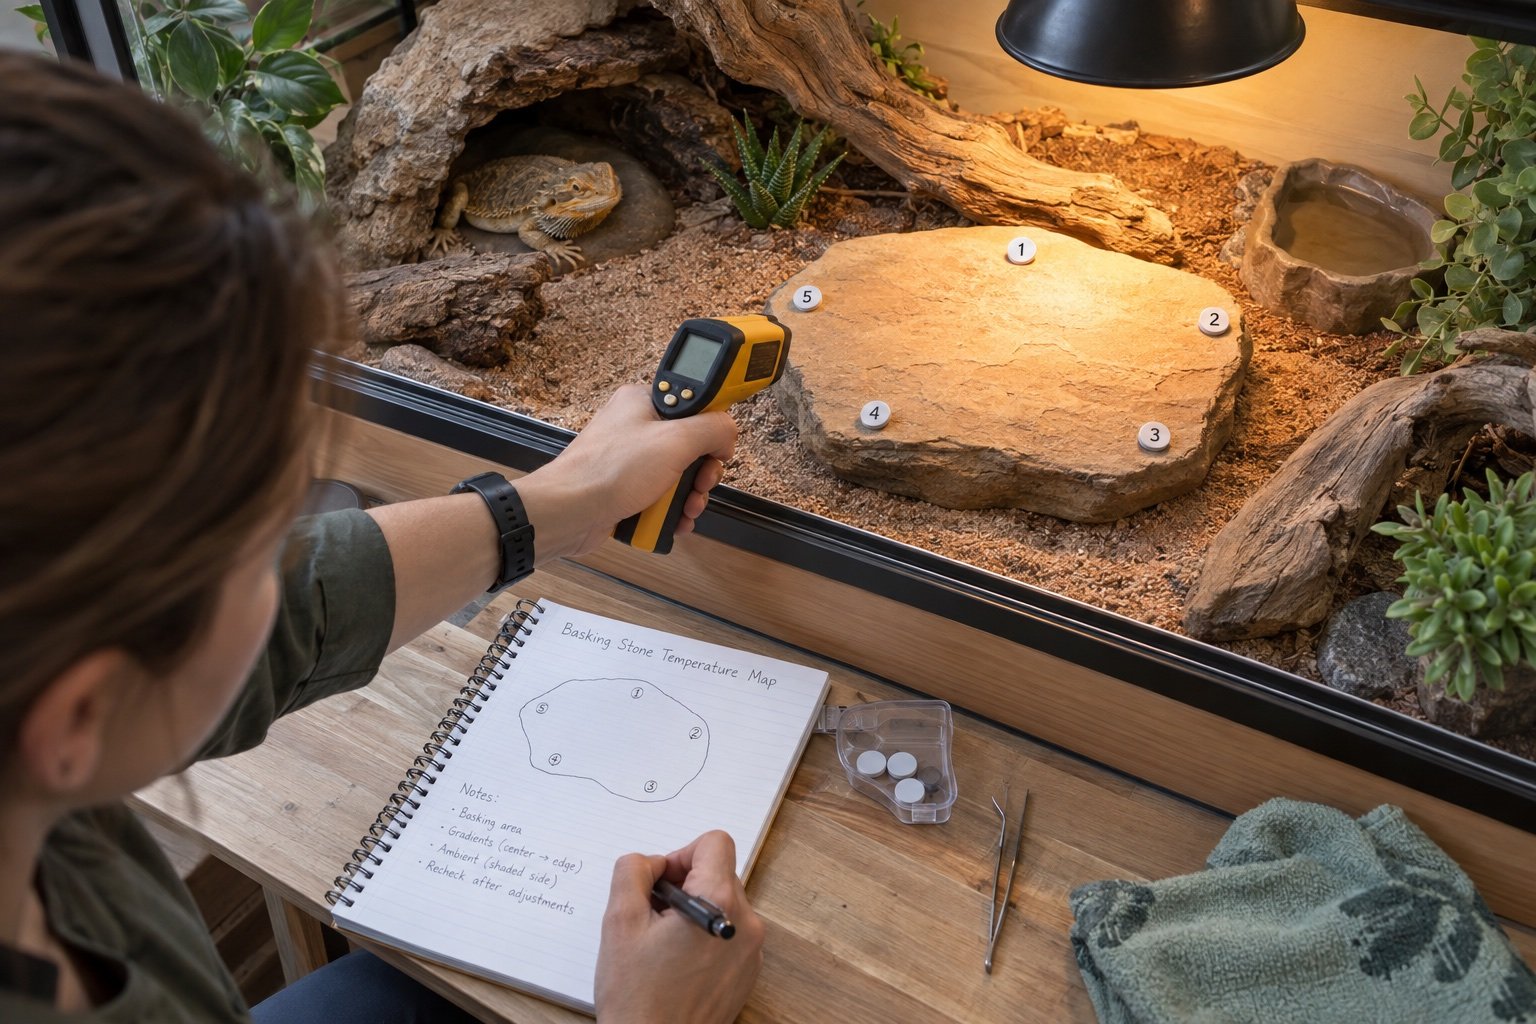
Quick verdict: A useful basking measurement describes a surface, a position and a time after warm-up. Pointing a thermometer at the brightest spot once is not a method. Map the whole usable area and record the conditions that produced it.
We judge the device or method by the job it can repeat. Keep the FLIR Edge Pro review and temperature monitoring tools nearby while planning the setup.
| Point | What to know |
|---|---|
| Warm-up | Measure after the system reaches a stable cycle |
| Target | Animal-height basking surface, not the bulb |
| Pattern | Center, edges and retreat route |
| Record | Distance, room temperature, time and heater setting |
Mark the exact surface
Choose the stone, branch or platform the animal can actually occupy. Mark the center and edges with removable reference points outside the contact area. Measure at the height and angle that represent the surface, not through glass. If the animal’s back sits much closer to the lamp than the platform, include that geometry in the safety check.
Let the enclosure finish warming
A surface may climb quickly while deeper material and room air continue changing. Start from a normal cold morning and record readings at intervals until the curve settles. Repeat near the end of the day. A thermostat can hold its probe steady while a dark rock continues gaining heat under light.
Respect distance-to-spot ratio
Infrared thermometers average a spot that grows with distance. At long range, the reading may mix a warm branch with cooler background. Move close enough for the measured spot to fit entirely on the target while respecting the instrument’s minimum distance. A laser marks aim, not the exact sampled circle.
Map choices, not one maximum
Take the center, both edges, the route into shade and the surface inside the nearest hide. A healthy thermal layout gives the animal several usable choices. The temperature gradient mapping guide expands this into a repeatable enclosure record.
Do not confuse body and surface readings
A quick scan of the animal can be informative, but scales, angle and recent movement affect it. It is not a substitute for habitat measurements or veterinary assessment. Use equipment readings to inspect the environment, then interpret behavior alongside species-specific husbandry and health information.
What a good installation looks like after one week
The equipment should be boring. Cables remain where they were fixed, schedules occur at the expected local time and the animal can use the enclosure without touching a probe or blocking a sensor. Charts show ordinary cycles rather than unexplained steps. Alerts are rare enough that someone will act on them.
Repeat the acceptance check after major cleaning, seasonal room changes or firmware updates. If the system cannot recover cleanly from a routine interruption, it is not ready to become invisible infrastructure.
Think about the next person who will touch it
A clear label and one-page record are better than a clever setup that only its builder understands. Name every channel by enclosure and job. Put the normal reading range, emergency shutoff and last test date where a carer can find them without opening an account or searching old messages.
Keep spare batteries, compatible probes and a basic manual near the room, but outside humid air. Do not store an unknown spare heater and assume it can be connected to the same controller. Record wattage, control type and the settings that were actually tested.
Review cost as part of the system
The purchase price is only the beginning. Include replacement sensors, lamps, batteries, cloud plans and the time needed to export or inspect data. A cheaper product that creates weekly false alarms can cost more attention than a simpler, stable device.
That does not mean the most expensive option wins. Buy the least complex system that safely performs the required job and leaves a readable record. Extra channels and connected features are worthwhile when they remove a real task, not when they merely make the dashboard look complete.
Keep the system easy to reverse
During early testing, use mounts and routing that can be adjusted without damaging the habitat. Mark the successful positions before making them permanent. Change one part at a time and keep the previous setting in the record. If the result gets worse, you should be able to return to the proven baseline.
Reversibility also applies to software. Export settings or photograph every screen before a reset. Avoid experimental automation on the same day that lamps, probes or enclosure furniture change.
Use the animal’s routine as a final check
Numbers describe the environment, while behavior shows how the animal uses the available choices. Note basking, hiding and movement at the same times for several days. A new device may be working electrically while its light, sound, airflow or placement alters normal use of the habitat.
Behavior cannot diagnose a technical fault by itself. Treat an unexpected change as a reason to inspect the enclosure, verify measurements and consider health, not as permission to keep adjusting settings until the chart looks pleasing.
Common mistakes
- Trusting the first stable-looking number without mapping the surrounding zone
- Changing several settings at once and losing the cause of the result
- Leaving probes, cables or mounts where normal animal movement can shift them
- Treating an app or remote alert as the primary safety control
- Skipping a power-recovery test because the device retained settings once
Related Reptile Tech Lab guides
Frequently asked questions
Can I measure through glass?
No. You will mainly measure or reflect the glass surface.
How many points should I take?
Enough to capture the center, edges and route to shade. Five to seven points is a practical start.
Is the laser the measured spot?
No. The instrument averages a larger area determined by its optics and distance.
Should I measure the reptile directly?
Habitat surface measurements are safer and more repeatable for setup work.